Introduction
Below you will find an overview of the different steps you will need to take to get started with the API integration of Certified Pick up (CPu).
CPu is an API-first product. However a User Interface (UI) is available for those parties that do not wish to integrate (just yet) and want to get started quickly. Please do note that NOT all features available through the API integration are also available in the UI.
In addition to the differences between the API integration and the UI, the available actions depend on the Role your company has in CPu.
We have documented the steps as well as possible below, but if you would still have any doubts or questions, don’t hesitate to contact our Support Team.
Before continuing, you need to make sure your company has been registered & you have subscribed to CPu.
User Acceptance Testing vs Production
To ensure a high level of quality in our production environment we have a User Acceptance Testing environment; which allows both you, the companies you work with and NxtPort to perform the necessary tests before moving to production.
This step is mandatory for all API integrations to allow you access to production and access to support.
Since these two environments are separated for security reasons, you will need to perform the steps below on both the User Acceptance Testing as well as the Production environment.
1. Register your company on the User Acceptance Testing environment
This process is nearly identical to the process described in https://www.certifiedpickup.com/en , except for some minor changes:
-
Do you already have an account on the ACCPT (testing) environment of My Poab?
-
If yes, go to https://my-accpt.portofantwerpbruges.com , log in using your testing credentials and follow flow B of the registration process;
-
If no, register your company at https://register-accpt.portofantwerpbruges.com and follow flow A of the registration process;
-
If you have no idea, follow flow C or contact the Customer Success Team, they will check it out for you;
-
-
The URL in the UAT environment is: https://crp-uat.nxtport.com;
-
If you go to the CPu UI in UAT, you are immediately directed to My Poab login.
2. API set-up
User Acceptance Testing UAT vs Production PRD environment
The CPu case offers two separated environments for the API integration: a Production environment for Live data and a User Acceptance Testing environment for integration setup and testing.
This allows you to test your API-integration prior to linking your production environment. However, unlike most sandbox or user acceptance environments that work independent of other stakeholders while integrating, the CPu use case is a process that involves several stakeholders. It requires input from other relevant involved parties. As such, please make sure that the other companies you wish to integrate with are aware that you will be sending test data through the User Acceptance Testing environment.
The following steps need to be done on both UAT & PRD environment
2.1 Create onboarding request
To start your integration process and get started on our UAT environment, you will need to create an onboarding ticket via this link. Our Support Team will gladly help you. You will need the following:
-
Your company name (as registered in My Poab)
-
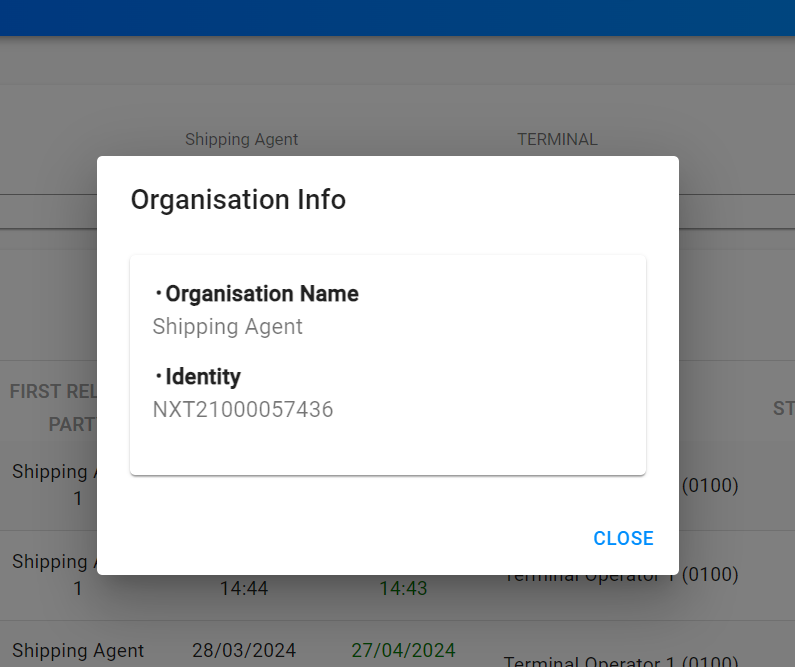
Your NxtPort ID can be found in CPu, click on your name at the right top and click “Organisation Info”
-
The Roles your company has been granted for CPu (Ship Agent, Terminal Operator, Release Party, Transport Operator)
2.2 Create API user
The users that are created when registering through My Poab are not valid API users. Contact NxtPort support so they can create an API user for you.
2.3 Request client credentials
Once the registration of your company has been completed and an onboarding ticket has been created, you will receive a client Id & secret from our Support Team.
2.4 API Authentication & authorization
|
|
URL UAT environment |
URL PRD environment |
|---|---|---|
|
NxtPort Authorization Server Host |
|
|
2.4.1 API Authentication
In order to use the API’s, you need to setup Oauth2 authentication (see https://auth0.com/docs/authenticate/protocols/oauth for more info) . When you have received the necessary credentials from NxtPort, you will be able to request an access token from our authorization server with the following parameters:
POST {{NxtPort Authorization Server Host}}/oauth2/v2.0/token
Request body (x-www-form-urlencoded):
-
grant_type:client_credentials; -
client_id: Client ID received from NxtPort (ref. step 2.3), (internal or third party), provided in step 2.3; -
client_secret: Client Secret to verify theclient_idprovided (ref. step 2.3), expires after 2 years; -
scope:https://b2cnxtweuprd.onmicrosoft.com/{{client_id}}/.default. To validate on the UAT environment, replace “prd” with “uat”.
Example of a PRD setup in Postman
Be sure to select the x-www-form-urlencoded format.

With the above information you can request an access token, valid for a period of 1 hour. This token is required to make successful API calls. For more information, see https://www.oauth.com/oauth2-servers/access-tokens/client-credentials/
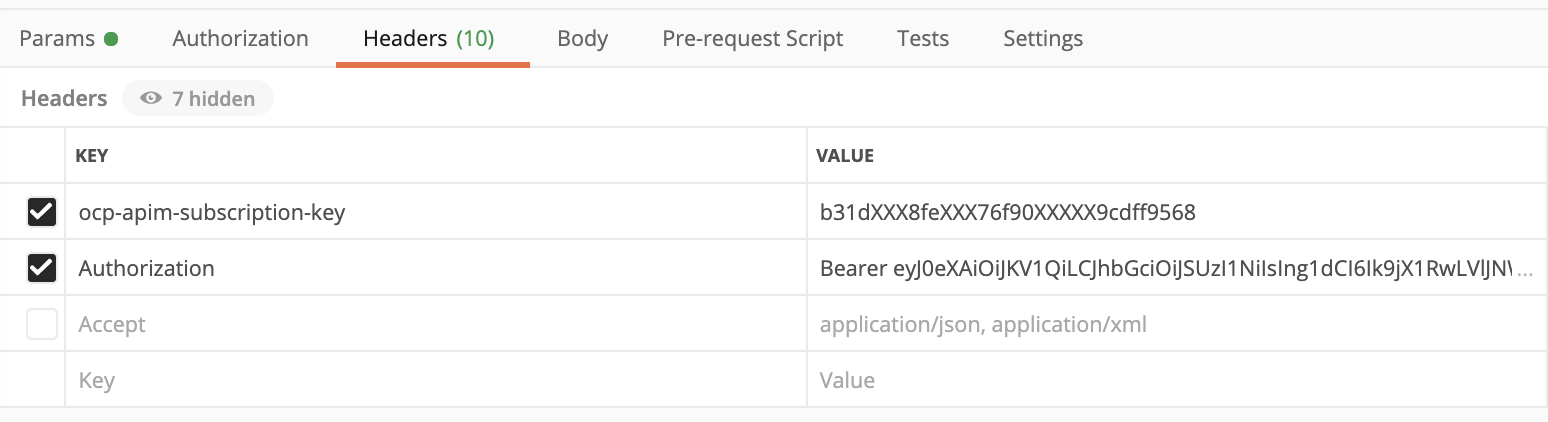
2.4.2 API Authorization
In order to call a web API:
-
include the API key of the stakeholder in your call: in the header as the
Ocp-Apim-Subscription-Keyparameter. Contact support to receive your subscription key. -
include the access token in your call using a header parameter with key
Authorizationand valueBearer {{TOKEN}}. Replace{{TOKEN}}with the token that you received in the previous step. The authorization token is created using the client key of the application builder. -
External software developers will need to use the API key of a subscribed stakeholders for which they are integrating
Example of a Postman setup
2.5 IP addresses
2.5.1 Your IP addresses
Provide your IP addresses per environment to NxtPort so they can be whitelisted for API communication. NxtPort support will ask to provide this info via a form. This is a mandatory onboarding step.
2.5.2 NxtPort’s IP addresses
If applicable, the following IP addresses should be whitelisted:
|
Public IPs/fqdn |
Environment |
Traffic Direction (NxtPort POV) |
Remarks |
|---|---|---|---|
|
UAT |
Inbound |
|
|
|
PRD |
Inbound |
|
|
|
13.94.136.122
|
UAT, PRD |
Outbound |
All outbound ip addresses must be whitelisted by the customer, the firewall randomly selects one to select send traffic. This is a Limitation of Azure Firewall. |
3. Setup your notification channel
CPu mainly uses an asynchronous notification mechanism using HTTPS POST endpoints. These asynchronous API calls have the following behaviour:
-
A post returns a “202 accepted” HTTP response status code to indicate the message was successfully registered. The message information is not processed at this point.
-
The message is processed internally. It may take some time to finalize the message processing, depending on the load of the platform.
-
The result of the message processing is posted to the notification channel post-back url once the message is fully processed. The return value may include:
-
An ok status when the message was processed
-
An error message when an error occurred, as defined in the API call specification (CPu notifications overview )
-
When integrating the use case with an API integration, this is an essential step in order to receive the required information.
The registration to the notification channel and the processing of the return calls is required.
Contact NxtPort support and provide them the necessary info:
-
Channel Name: The name of the channel to be able to distinguish the channel from other channels
-
Endpoint URL: The address to where the POST request must be sent
-
Headers: Optional headers will be added to the POST request when sending the notification. It is possible to add an ‘Authorization’ header when the Authentication Type is set to none
-
Authentication Type: It is possible to let the NxtPort Notification Service fetch the access token itself, instead of using a static bearer token. This can be done by chosing for OAuth2 Client Credentials or OAuth2 Password Flow. This is not mandatory. Add these fields if you want to use 1 of these types.
|
Field Name |
Info |
|---|---|
|
Token Endpoint |
The address where the token should be fetched from (e.g. |
|
Client Id |
The client id that should be used |
|
Client Secret |
The client secret that should be used |
|
Client Scopes |
Optional scopes that should be sent with the request, can contain multiple scopes separated by whitespace |
|
Grant Type |
Grant Type that should be used, automatically filed in based on the authentication type |
|
Authentication Headers |
Optional headers that should be sent when fetching the access token |
|
Username |
The username that should be used (only for password flow) |
|
Password |
The password that should be used (only for password flow) |
We suggest to use a token which is at least valid for 1 hour
Please note that all new and updates to notification channels must be validated on UAT environment first. Support will setup the notification channel on UAT environment according to your specifications and can assist in triggering notifications for testing the channel.
What’s next?
Need any further assistance?